The best walk-in shower ideas start with the spray, not the glass. Put the head at the far end, the valve by the opening and a fixed panel long enough to catch the water, and the floor outside stays dry. Large tiles, a hidden linear drain and a lit niche then make it feel generous.
In this guide 11 sections
- Ten walk-in shower ideas at a glance
- The spray decides the glass
- Where the head, valve and window go
- Two Aldenham showers, as drawn
- Large tiles make the walls go quiet
- The shower floor: grip first, then the drain
- Niches, ledges, seats and light
- What are the downsides of a doorless shower?
- What does a walk-in shower cost?
- Can a small bathroom take a walk-in shower?
- The bottom line
A walk-in shower is often the one item on a renovation list that nobody in the house argues about. Everyone wants the open glass from the hotel, no tray lip and no door to squeegee. What never makes the mood board is stepping out onto a dry floor on a dark Tuesday morning, and that comes down to four positions you can barely see once the room is finished: the head, the valve, the end of the glass and the drain.
The subject here is a walk-in shower inside an ordinary bathroom or en-suite, where the rest of the room stays dry. If the whole room is going to be the shower, read our small wet room ideas instead, because that plan starts from a different question.
Ten walk-in shower ideas at a glance
- Head at the far end and valve beside the opening, so you can start the water without standing in it.
- One fixed panel, made to the length of the spray rather than a stock width.
- A short hinged deflector where the shower is too short for open glass.
- Low-iron glass beside white marble looks, so the edge loses its green tint.
- Wall tiles at 600x1200mm or a full 1200x1200mm, so the shower reads as one calm plane.
- Glossy on the walls and matt on the floor, in the same marble look.
- A tile-in linear drain under the head, so one floor tile runs from the door to the back wall.
- One long niche on the entry wall, out of the direct spray, lit with a warm LED strip.
- A tiled bench or half-height ledge that hides the pipework and gives you somewhere to sit.
- In a loft, the head where the ceiling is highest and glass cut to the slope.
Every one of those is cheap to change on a drawing and expensive to change in tile.
The spray decides the glass
Choose a single fixed panel when the head sits far enough from the opening for the water to fall before it gets there. Choose a door when it does not. A panel works on distance alone: the water leaves the head, hits you and drops. Put the head close to the opening and the glass becomes decoration, and the floor gets wet every day.
In a compact en-suite, a frameless door is often the more luxurious answer, simply because nobody has to dry the floor after every shower.
| Glass option | Best for | Trade-off |
|---|---|---|
| Single fixed panel | Long showers, head far from the opening | Needs length; some splash at the opening |
| Panel with a return | Medium-length showers | A narrower way in |
| Panel with a hinged deflector | Shorter showers that want an open look | One more hinge to keep clean |
| Frameless door | Short or narrow spaces | Less open; seals and hinges to maintain |
Three glass details change how the finished shower looks. Standard toughened glass carries a faint green tint that shows against white stone, so a pale marble look deserves low-iron glass. A profile recessed into the wall is quieter than a surface-fixed channel, and it has to be decided before the tiles are set out, not after. A tall fixed panel usually needs a stabilising bar, so draw where it lands and keep it clear of the niche and any light.
Where the head, valve and window go
The opening should face away from the bathroom door if it can, the valve should sit near the opening and the window should stay out of the spray. Get those three right and the room works before a single tile is chosen.
Valve position is the cheapest improvement to daily use there is. With the controls by the entry and the head at the far end, you reach in, turn the water on and wait for it to run warm. With both on the back wall, every shower starts with a cold blast down your back.
Now look at the shower from the bathroom door. If it is the first thing you see, its back wall is the view from the landing, so give that wall your best tile and your best light. A window inside the shower means a wet reveal and a timber frame that suffers, so if the shower cannot move, waterproof the reveal with the walls.
Two Aldenham showers, as drawn
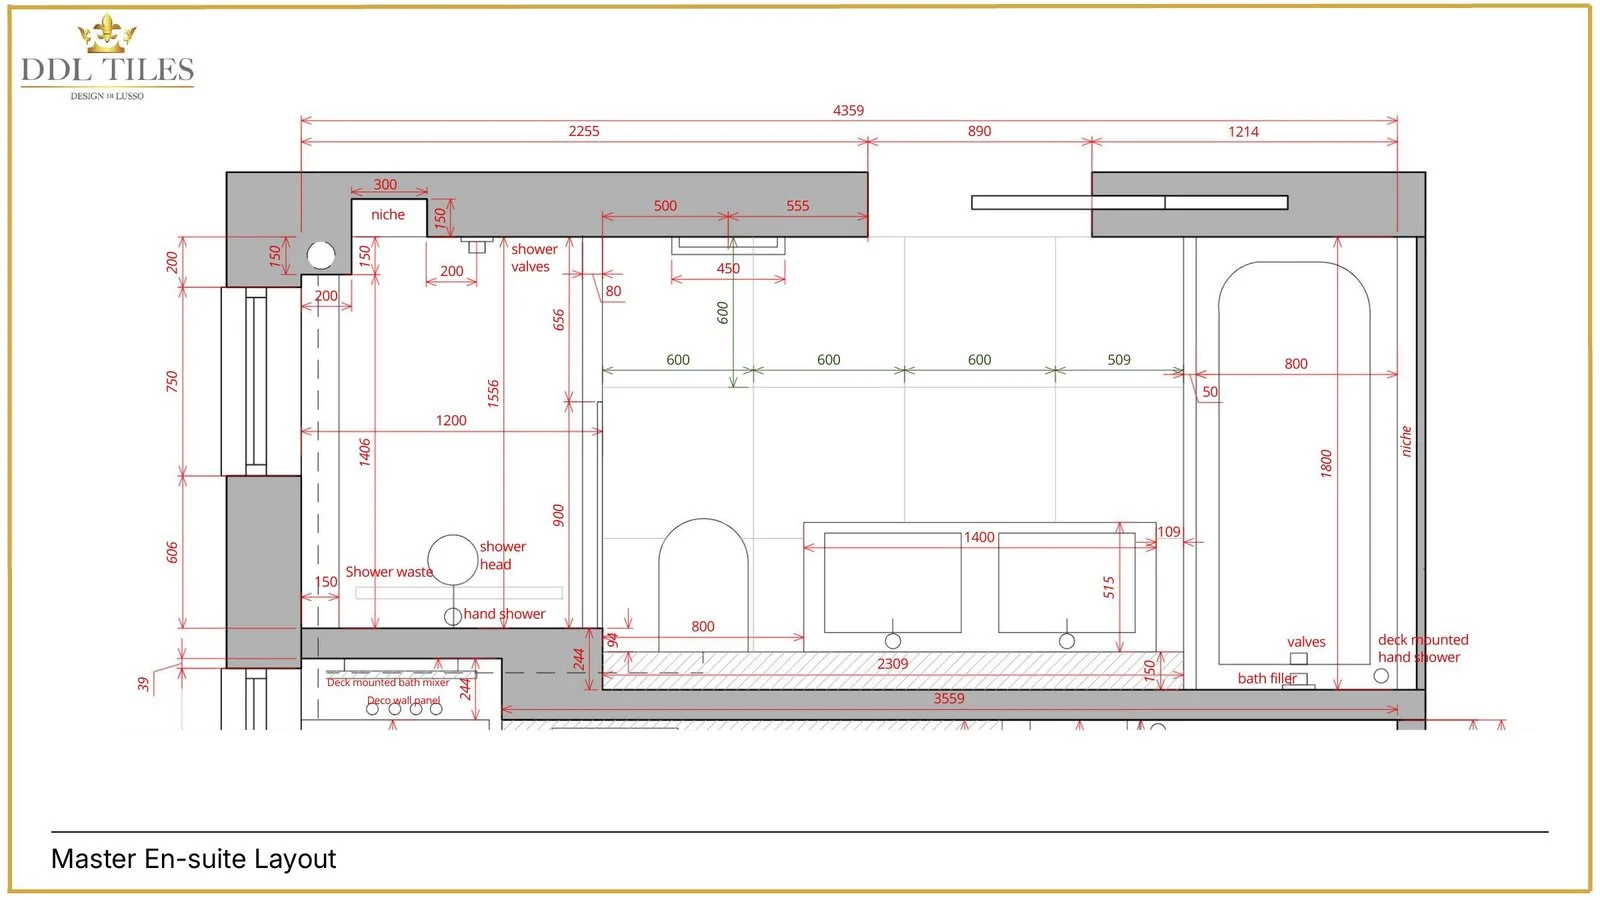
DDL's Aldenham design shows both sides of this decision in one house. The drawings are design visuals, not photographs of finished rooms, but they show the positions this page is about at real scale.
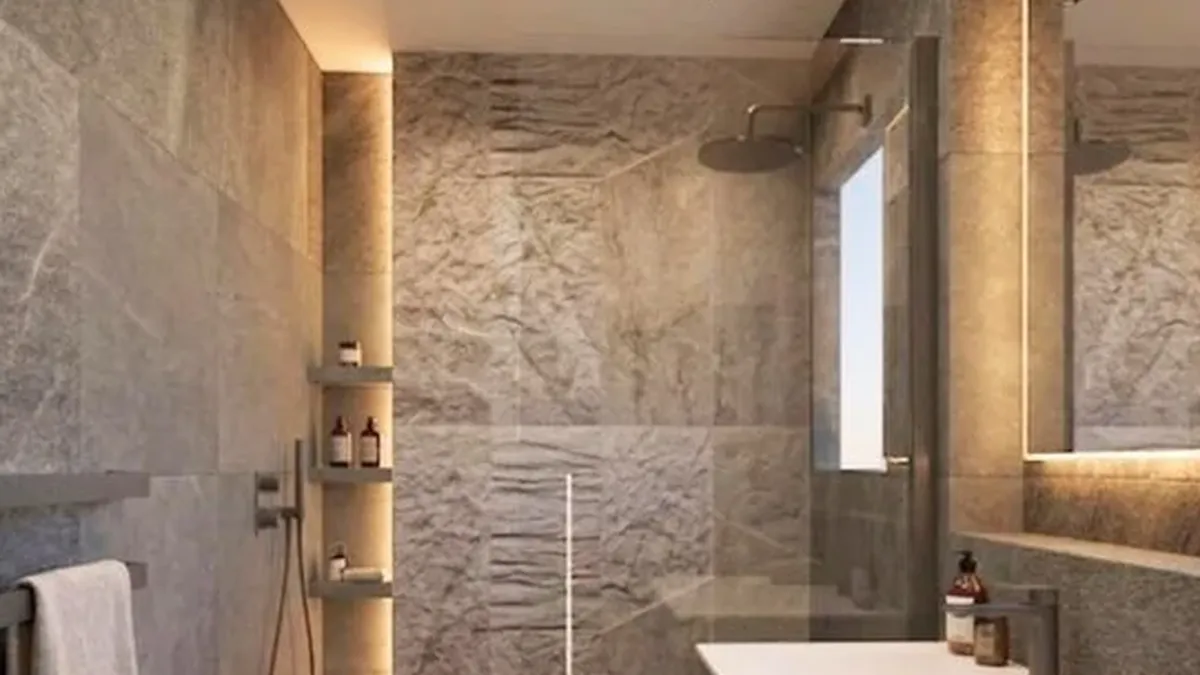
The master en-suite shower is drawn 1200mm wide and roughly 1.5m deep. You step in at one end, where the shower valves and a 300mm niche sit on the end wall, well away from the water. The head is at the far end, and the shower waste is drawn as a channel across the back, directly beneath it. The glass runs along the side and stops short of the valves, leaving an opening of about 650mm.
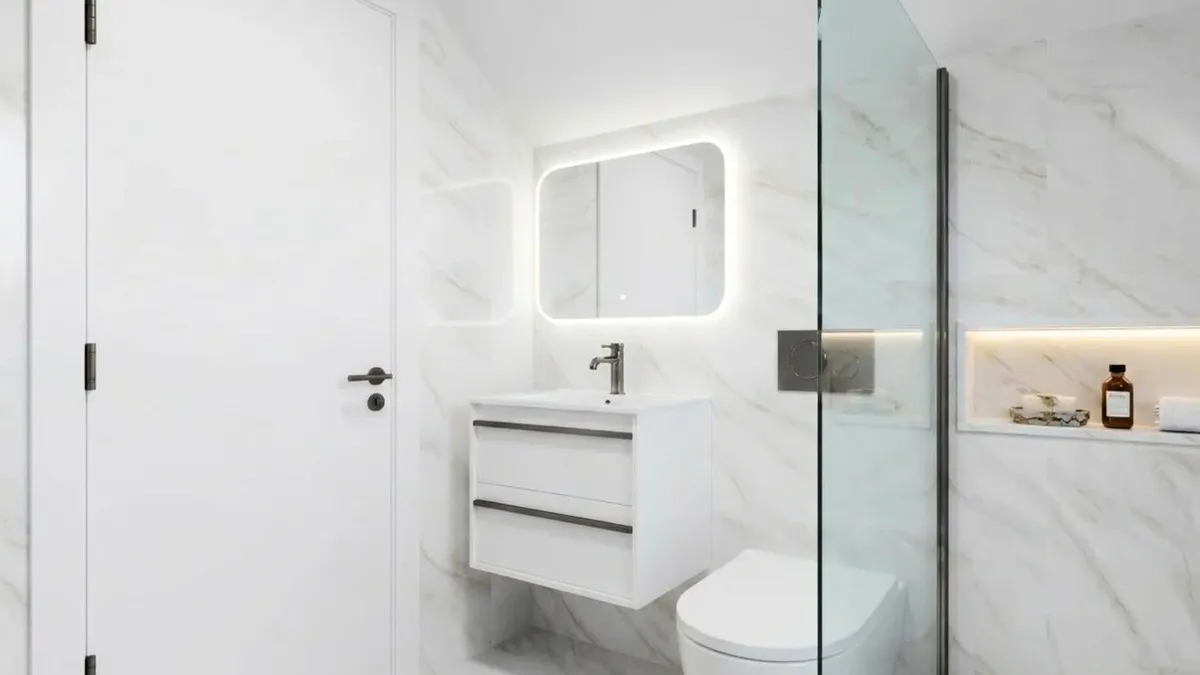
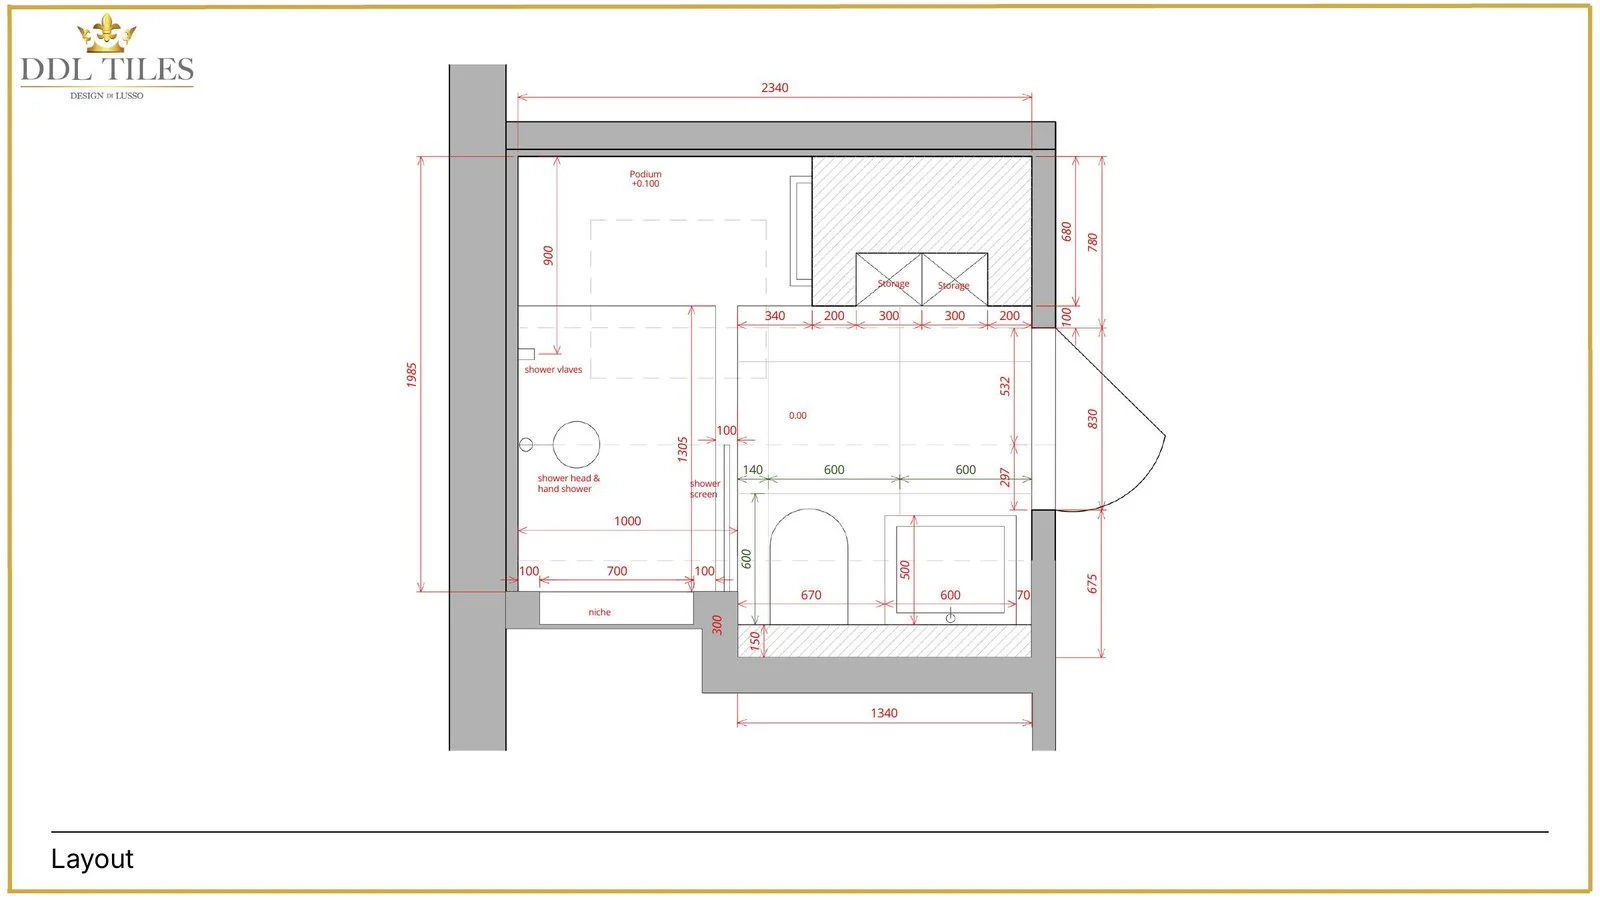
The guest bathroom is the more instructive compromise. Its shower is 1000mm wide, with a 700mm niche and the head and hand shower on the long wall, under a sloping ceiling. The plan also marks the shower area on a podium 100mm above the bathroom floor, so this is a stepped shower, not a level-access one.
A raised shower floor is a legitimate choice where the floor below cannot be lowered, because it gives the fall and the waste pipe room to work without cutting into the structure. Make that choice knowingly, though. A 100mm step is fine in a guest room used by adults; it is the wrong answer for a parent who may one day need step-free access.
The guest bathroom's tile page is worth copying as well. It pairs a glossy 1200x1200mm marble-look tile on the walls with a matt 600x600mm tile on the floor, in the same white. The room reads as one stone; only the finish and the size change where your feet need grip. All five rooms are in the Aldenham Home design project.
Large marble looks are hard to judge on a phone. Book a complimentary showroom appointment and you can see a 1200x1200mm wall tile beside a matt floor tile in real light, at the size it will be fitted. Bring a photo of the bathroom, its measurements and the square metres of wall and floor, and we can quote once you have chosen.
Large tiles make the walls go quiet
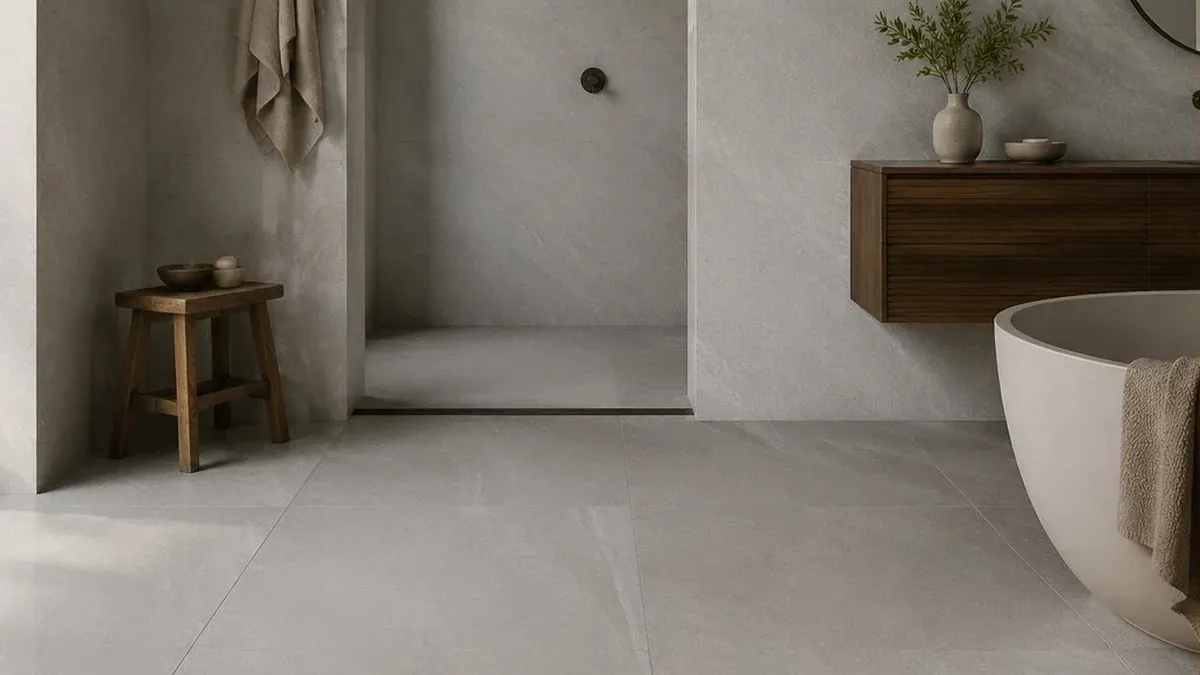
Fewer joints let the shower walls read as calm planes, and carrying the bathroom floor tile into the shower removes the line that tells your eye where the shower stops. On the floor, continuity matters more than size. On the wall you face in the shower, start with a full tile or a balanced cut, never a thin sliver in the corner, and order walls and floor together so every piece comes from one production batch.
Dinesh Mathur founded DDL in 2011 as a tile sourcing service for architects, and the studio still sources from selected Spanish and Italian factories rather than from a stock list. That helps when you want the same marble look in a glossy wall size and a matt floor size that genuinely belong together.
The shower floor: grip first, then the drain
Ask for the wet pendulum test value, because a shower floor is used barefoot and wet. HSE guidance treats a pendulum test value (PTV) of 36 or above as low slip potential (HSE GEIS2), and that is the number to compare between tiles. Most ranges also quote an R rating from R9 to R13 under DIN 51130, but R ratings come from a ramp test walked in shoes, so treat R10 or R11 as a second check rather than the answer.
The trade-off is cleaning. More grip usually means more texture, and deep texture holds limescale in a hard-water area, so a fine matt or softly structured finish is usually a better balance than an aggressive anti-slip surface.
The drain is a short decision once the layout is right. A linear drain lets the shower floor fall one way as a single plane, so a large tile can run through with straight cuts; a centre gully needs four falls meeting at a point, which suits smaller formats and mosaic. A low-profile tray is the contained, forgiving option, while a level-access floor looks cleaner but asks more of the joists, the threshold and the waterproofing. Where the drain can go depends on the waste route and, upstairs, on the direction of the joists, so your installer confirms both before the layout is fixed.
Level access and full tanking are covered properly in our complete guide to wet room design and tiling.
Niches, ledges, seats and light
A niche earns its place on a wall out of the direct spray, which in most showers means the entry end, as in the Aldenham master en-suite. One facing the head fills with water and soap; one behind the head means reaching through the spray every morning. Draw it with the wall tiles, so its edges meet joints rather than leaving a strip of cut tile above or below.
Where a wall cannot take a recess, build out instead. A boxed section at half height hides the pipework and gives a long tiled shelf, with room for a strip of light. The Stanmore master en-suite goes further: its layout schedule lists a bespoke shower screen, a shower bench, a ledge with LED and a niche with LED in the one shower.
A tiled bench is built and waterproofed with the walls, so it has to be decided before first fix; a fold-down seat is the lighter alternative if the wall behind can take the load.
Light the shower as its own zone: one fitting overhead for washing, and a warm LED strip in the niche or ledge for the evening, which doubles as a night light. Light grazing down a textured wall flatters the tile but exposes every uneven joint. Fittings in a shower need the right protection rating for their zone under BS 7671, and your electrician confirms each one before it is ordered.
What are the downsides of a doorless shower?
Splash, warmth and privacy. In a long shower with the head at the far end, none of them shows up much. In a short room, each one shows up every day.
Point the head towards the opening and water reaches the vanity, the skirting and the door frame, where timber swells and silicone fails early. Warm air escapes past an open panel, so a walk-in shower can feel cooler than an enclosure. In a shared family bathroom, an open shower in view of the door is not for everyone.
The usual mistakes behind a wet floor are layout decisions, not tile choices: glass sized to a stock width instead of the spray, a head on the wall facing the opening, or a centre gully under 1200mm tiles. Each one is a line on a drawing long before it becomes a problem in the room.
What does a walk-in shower cost?
A walk-in shower is usually priced as part of the whole bathroom. DDL's luxury bathroom cost guide says a luxury bathroom in the UK typically costs between £25,000 and £60,000 in 2026. Within that, waterproofing and tanking typically add £600 to £2,500+, and underfloor heating typically adds £800 to £2,500 to a bathroom.
The biggest swings in a shower come from the floor. A tray on the existing floor, with the waste where it already runs, is the simplest route; a level floor, a moved drain or made-to-measure glass each add work.
Can a small bathroom take a walk-in shower?
Yes, if you accept a door or a deflector where the room is too short for open glass, and run the shower across the full width at one end. When the room is too small to keep anything dry, it is usually better planned as a wet room, and our small wet room guide starts with the test for that.
The bottom line
A walk-in shower stays dry when the head sits at the far end, the valve sits by the opening and the glass is sized to the spray rather than to a stock width. It feels generous when nothing interrupts it: large wall tiles, one floor tile carried through, a hidden linear drain and a niche at the entry end. Ask for the wet PTV on the floor tile and aim for 36 or above. If the drawings raise the shower on a podium, as the Aldenham guest bathroom does by 100mm, know why before you agree to it, especially if step-free access may matter later.
Start with a complimentary showroom appointment: bring the room's measurements and a few photos, and see the wall and floor tiles side by side at full size. If you would like the glass, valve positions and tiles drawn up as one scheme, the next step is our bathroom design service at £400 + VAT per bathroom, deducted from your subsequent order when that order exceeds £5,000 + VAT. Design usually takes 2 to 4 weeks, so a scheme started now can be drawn up before Christmas. DDL designs and specifies; your installer works from the written specification.
Sources
- HSE GEIS2: Assessing the slip resistance of flooring, where a PTV of 36 and above means low slip potential.
- DIN 51130: the shod ramp test behind the R9 to R13 slip classes.
- BS EN 14411: ceramic tiles, with porcelain in group BIa at 0.5% water absorption or less.
- BS 7671 (wiring regulations) and Approved Document P: electrical safety in dwellings.